Cascade CMS
Getting Started
 Cascade CMS from Hannon Hill is a content management system that empowers users to create, publish, and manage digital content. Cascade CMS is a content management system built for everyone. It's the balance of ultimate flexibility enabling fast development with easy-to-use functionality for non-technical contributors that makes Cascade CMS really special. Their goal is to give everyone at our organization the tools they need to build high-performing websites with fresh and impactful content.
Features
Simple Content Entry Wizards
Enter content through either simple WYSIWYG editors or structured fields like file choosers, checkboxes, drop-down boxes, and text fields.
Proactive Quality Control
Check for broken links, spelling errors, and accessibility violations prior to publishing your content to the live site.
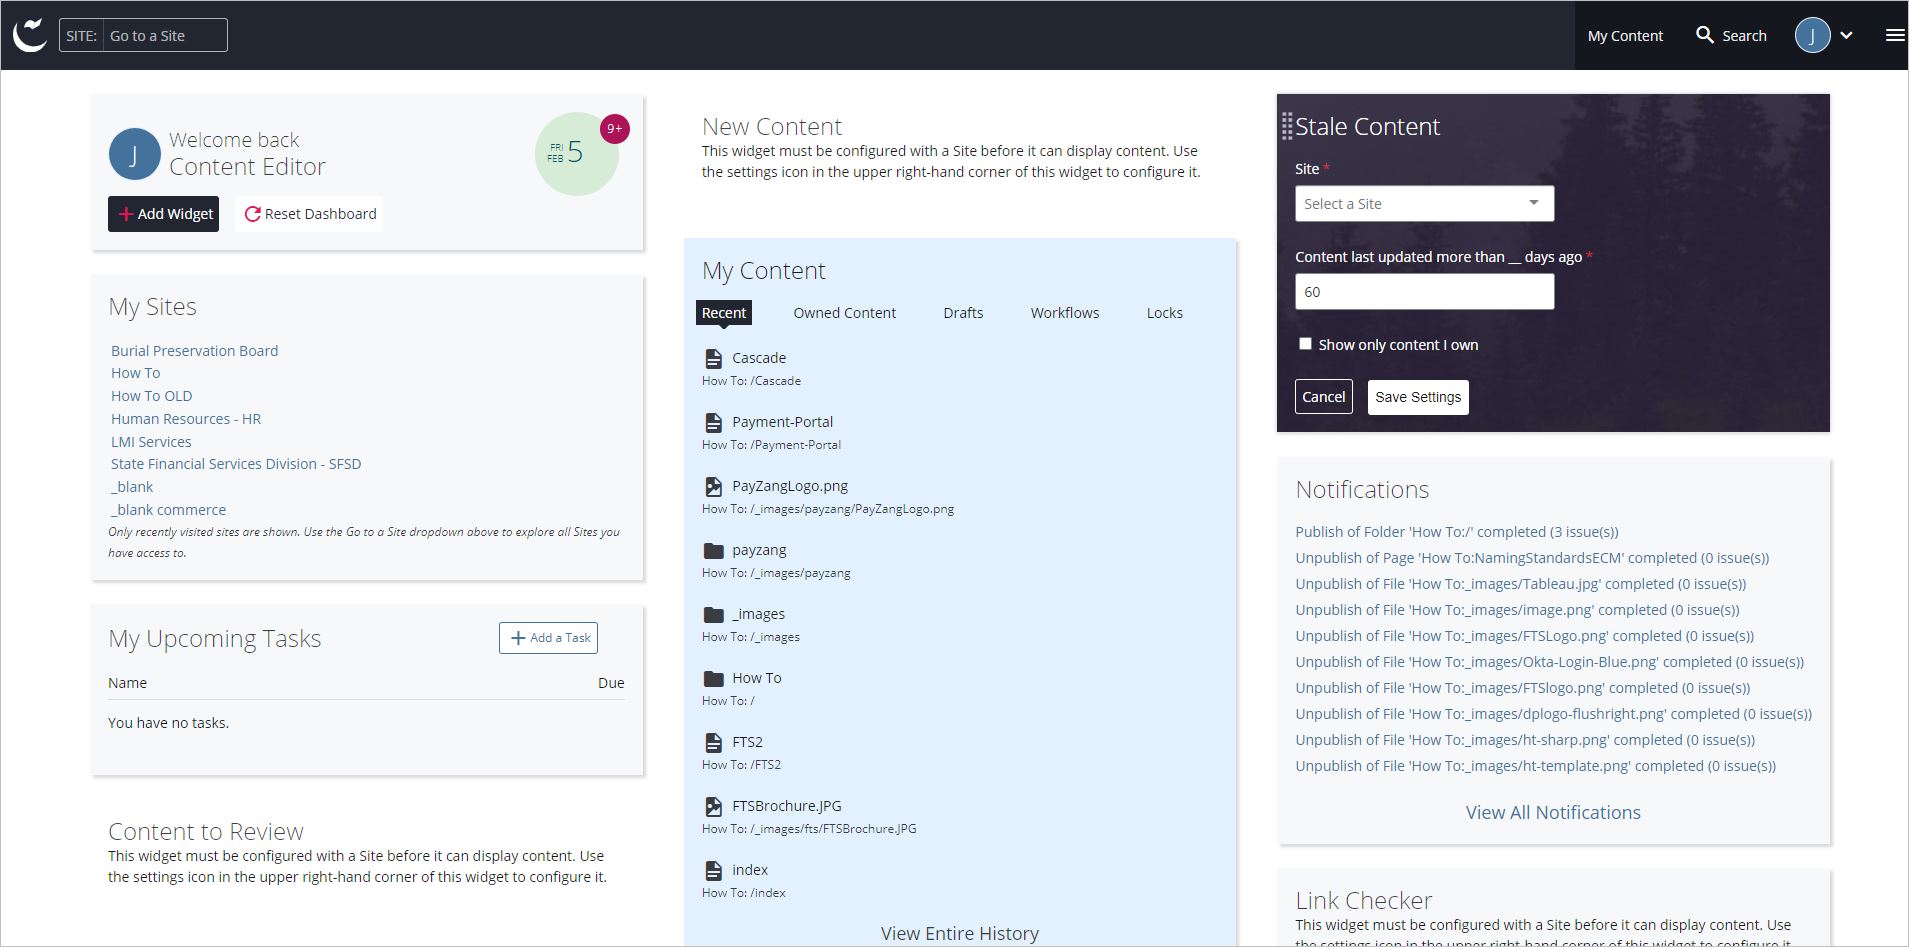
Customizable Dashboard
Tailor your dashboard by adding widgets such as history, broken link report, stale content report, inbox, workflows, drafts, or locked assets.
Super Easy Content Reuse
Share content across multiple pages and multiple sites, both automatically and manually. No CMS makes content reuse easier than Cascade CMS.
Content Health
Cascade CMS can alert users and site administrators of pages that have not been updated in any number of days, weeks, months, or years. Use the daily content report, task manager, and content review dates to keep content fresh.
Native Image Editor
Use the native image editor to rotate, resize, crop, edit, and make other changes to your graphics and illustrations.
Version Control
Keeps 20 versions of your pages, compare them, and roll back to a previous version with just one click.
Support for XSLT and Velocity
Cascade CMS supports both XSLT and Velocity for writing formats. Even use both on the same page. Incorporate built-in tools to harness content and do more with less code.
Advanced Code Editor
The Advanced Code Editor is a built-in syntax-highlighting editor for a variety of languages, auto-indentation and auto-formatting, code folding and code snippets.
Rendering Metrics
Check rendering times for each region on your page, helping you better target and identify those regions that can be further optimized.
Site Import and Export
Maximize content portability by transferring your production site to a development instance with just a few clicks.
Site Copy
Create a new site based off a template site within less than a minute.
Assume Identity
For Administrators, you can Use the Assume Identity Feature to see exactly what a specific user sees and quickly troubleshoot issues.
Multi-Site Management
Manage as many Cascade CMS sites as you need from the same instance. Create site specific user roles, share content across multiple sites, and publish to specific destinations and servers.
Robust Permissions
Apply permissions on sites, directories, page types, individual pages, specific regions on a page, and even individual content entry fields.
Training Videos
- Sign In To Cascade (using this link PROD Sites | Cascade CMS) - always use lower-case letters in your c# while logging in.
- Cascade CMS End-User Training: This self-paced course provides a flexible learning experience, allowing participants to progress at their own pace while mastering the Cascade Content Management System. Whether you are a beginner or seeking to deepen your knowledge, this course provides the foundation needed to excel in web content. management using Cascade CMS.
- Advanced Course Cascade CMS for Web Developers: A compilation of video trainings provided by Hannon Hill to SITSD for Web Developrs.
- Modifying the State Directory: A quick video outlining how to make changes to the State Directory (https://directory.mt.gov).
- State News Articles: How to add News Articles to the news.mt.gov site
- Legislative Finance Committee (LFC): Adding a New Report
- Legislative Finance Committee (LFC): Editing an Existing Report
Documentation
Internal Links
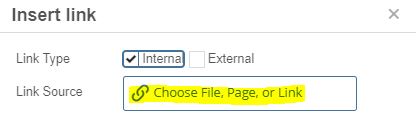
These are links to content that exists within Cascade. You can link to documents, files and pages. Anchor links are also considered internal links.
- Make sure that the link text is descriptive. "Read More" and "Click Here" link text isn't very helpful to users with assistive technology.
- If you're linking to a document, we recommend adding document title in Title field.
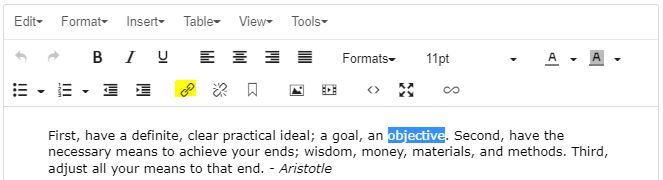
- Select the text that you want to add a link to and Click the Insert/edit link button in the WYSIWYG toolbar.
- Click Choose File, Page, or Link option to navigate to the appropriate asset. Once you have located the asset to which you wish to link, click Ok button.
Anchor Links
An Anchor link is an invisible bookmark on your page. When pages have a large amount of text, such as an FAQ page, it is easier to break up the page using anchors.
- Place your cursor in your text where you want to add an anchor and Click the Anchor button in the WYSIWYG toolbar.

- In the Id field, type a short name for your anchor, click Ok. Use dashes instead of spaces for longer ids.

- You will now see a small anchor image where you have placed your anchor. This anchor image is only visible within Cascade – this image will not appear on the published page.

- Select the text that you want to add a link to and Click the Insert/edit link button in the WYSIWYG toolbar.
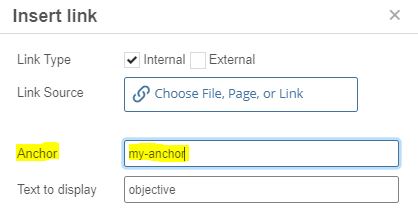
- Type the anchor name into the Anchor field, click Ok. You may use this for the page you are currently editing, or a page elsewhere on your site. If you wish to add an anchor to another page on your site, first choose the page you will link to (as described above). Then, type the appropriate name into the Anchor field.
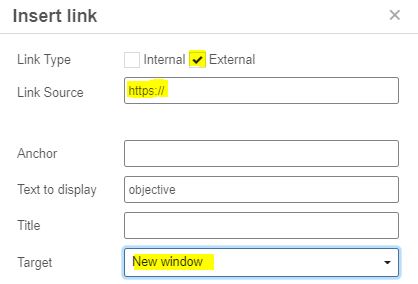
External Links
External links are links to pages that are not part of your website in Cascade. If you cannot link to a page via Cascade using the folder tree, it’s considered external. Linking to an email address is also considered an external link.
- Select the text that you want to add a link to and Click the Insert/edit link button in the WYSIWYG toolbar.
- Under Link Source check the External checkbox. In the Link field, type or paste the external website URL (make sure that the URL starts with http:// or https://), click Ok.
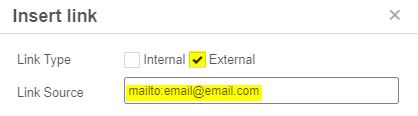
Email Address Links
- Select the text that you want to add a link to and Click the Insert/edit link button in the WYSIWYG toolbar.
- Under Link Source check the External checkbox. In the Link field, erase http:// and type mailto: followed by the email address, click Ok.
- If you want to automatically set the subject of the email, add this to the end of it (use %20 between words instead of spaces):
?Subject=Library%20Information
Most of the Cascade sites are using the Bootstrap 5 framework, so any helper classes from their documentation will work on your site.
Most of the Cascade sites are set up to use Font Awesome 5. You can find the list of their free icons.
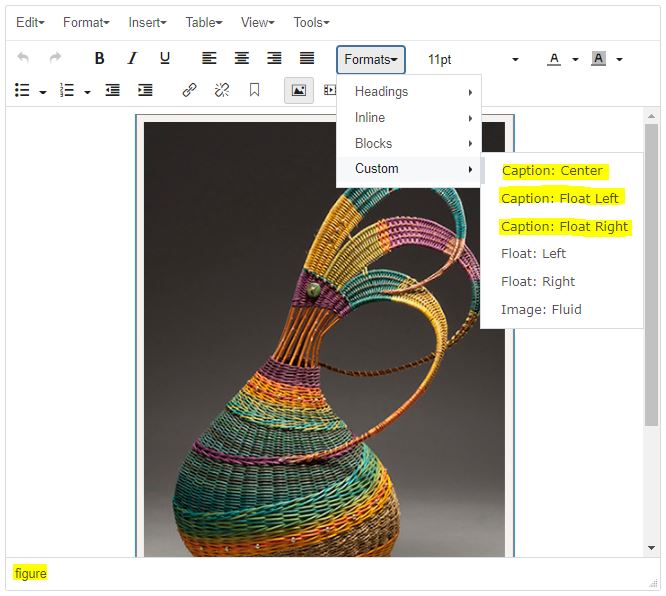
- Click the Insert/edit image button in the WYSIWYG toolbar. Choose the image and enter Image Description (alt/text) per usual.

- Under the Advanced tab, check Use Figure/Caption checkbox and click OK.
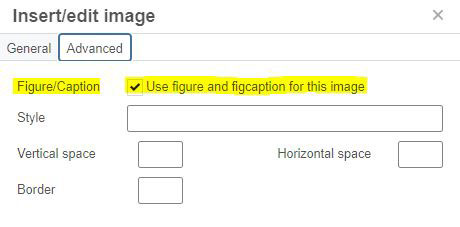
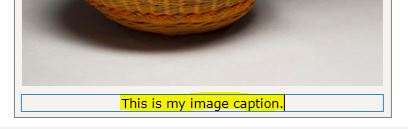
- You will now have a caption field below the image. Highlight and change the image caption as you wish.
- Now highlight the whole caption box around image (a thin blue line appears around it and the word Figure appears in bottom left), go to Formats > Custom and select one of these: Caption-Center, Caption-Float-Left, Caption-Float-Right options.
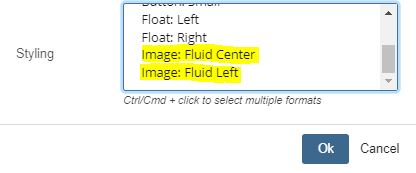
There is a built in Custom Format option that you will want to use for pretty much any image you put in a WYSIWYG unless it is a small image. This class helps the image to scale down on all device sizes.
- Click the Insert/edit image button in the WYSIWYG toolbar. Choose the image and enter Image description (alternative text for screen readers) per usual.
- Choose the Image: Fluid Center or Image: Fluid Left option in the Custom Formats section.
You will notice that the Content field looks similar to other word editing programs such as Microsoft Word. In web editing, this is called a WYSIWYG (pronounced WIZ-zee-wig) editor. It stands for "What You See Is What You Get". Given that you will recognize many of the buttons used in the WYSIWYG editor, we will only go over the ones that are unique to web editing.

Cut/Copy/Paste
These options can be found under the Edit dropdown. You may also use keyboard shortcuts:
| Option | Keyboard Command |
|---|---|
| copy | ctrl+c |
| paste | ctrl+v |
| cut | ctrl+x |
Paste as Text
When you attempt to paste text from an outside application, the text can carry hidden web code. To remove this code as you paste, use the Edit > Paste as Text option. This will ensure that all pre-existing formatting is removed. Although this button will eliminate many future problems, it removes all formatting. This means that any bold, italic, underlined, or linked words will appear as plain text. You will need to manually add format options to your text.
Superscript, Subscript
These formatting options are located under Format dropdown. To apply these styles, simply select the text and then select the style.
Apply Headings
Headings can be used to create a structure for search engines and visual hierarchy on the page. To apply headings, select the text, go to Format > Formats > Headings and then select the heading you wish to apply. 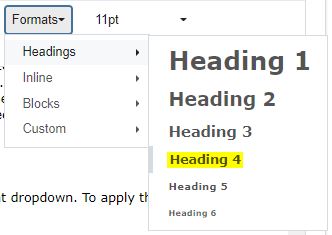
- Always use headings to structure the content of your webpage, not to style it. Don't use a heading because of the way it looks.
- Make sure that the headings are used in an order. Heading 1 is reserved for your site title and Heading 2 is reserved for the page title. This is applied automatically. In the main content area, you may use Heading 3-Heading 6 multiple times in your webpage if it makes sense to do so.
Site Analytics
Google Analytics Installation
The State of Montana is moving to Google Analytics. Below is the code and documenation to add Google Analytics 4 (GA) to your Cascade site, an end-user Cookie Consent Notice page and a Cookie Acceptance Modal. You are required to add in the Modal and End User page when installing GA.
Angelfish Analytics is sunset on November 1, 2023.
Google Search
Google Programmable Search
Turning on Search: You can control the use of the Search box on your site w/ the settings in the Set-Up-Block on your site. In order for this search to work, you will need to setup your site in the Google's Programmable Search console to obtain an ID or request us to setup one for you w/ a case to the service desk.
Ad Removal: If you are using the built in google search, you will want to request ads to be removed from the search results with this form for each site using search.
Google Search Console
Using the Google Search Console, you can submit sitemaps and request crawls to clean up any link changes or meta keyword/descriptions adjustments. If you site recently changed from HTTP to HTTPS, there is information about adding this https version of the site as a new profile in your Search Console.
Developers
- Cascade Dashboard
- Providing Content
- Permissions and Access
- Workflow Demo
- Creating a Page: Template to Asset Factory; First Format: Main Content
- Velocity Coding/Index Blocks: Carousel, Navigation, Breadcrumbs
- Velocity Coding/Index Blocks: Macros, News
- Publishing
- Cascade Migration Tool Training